Tuesday, 31 December 2019
Sunday, 24 March 2019
git_version_control
What is version control?
A version control system is a tool that manages changes made to the files and directories in a project.
Nothing that is saved to Git is ever lost, so you can always go back to see which results were generated by which versions of your programs.
Git automatically notifies you when your work conflicts with someone else's, so it's harder (but not impossible) to accidentally overwrite work.
Git can synchronize work done by different people on different machines, so it scales as your team does.
Version control isn't just for software: books, papers, parameter sets, and anything that changes over time or needs to be shared can and should be stored and shared using something like Git.
Where does Git store information?
- Each of your Git projects has two parts:
- The files and directories that you create and edit directly
- .git folder
- Git stores all of its extra information in a directory called .git located in the root directory of the repository. Git expects this information to be laid out in a very precise way, so you should never edit or delete anything in .git
How can I tell what I have changed?
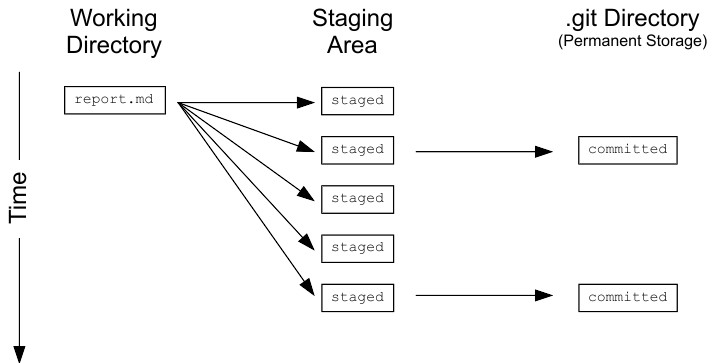
Git has a staging area in which it stores files with changes you want to save that haven't been saved yet. Putting files in the staging area is like putting things in a drapt, while committing those changes is like putting that box in the mail: you can add more things to the box or take things out as often as you want, but once you put it in the mail, you can't make further changes.
git status shows you which files are in this staging area, and which files have changes that haven't yet been put there. In order to compare the file as it currently is to what you last saved, you can use git diff filename. git diff without any filenames will show you all the changes in your repository, while git diff directory will show you the changes to the files in some directory.
Clone a repository of rritec
Step 1: Create one empty directory on desktop with today date
- you can create manually by going to desktop
or
- run below code
In [0]:
import os
from datetime import datetime
In [0]:
os.chdir("C:\\Users\\Hi\\Desktop")
In [0]:
today = datetime.now()
In [0]:
today
Out[0]:
datetime.datetime(2019, 3, 24, 9, 36, 59, 602000)
In [0]:
today.strftime('%Y%m%d')
Out[0]:
'20190324'
In [0]:
os.mkdir("batch - " + today.strftime('%Y%m%d'))
Step 2: Open Gitbash in that folder and clone
- go to above folder (it was created as part of step 1, example batch - yyyymmdd)
- Right click
- click on Git Bash Here
- run below code
git
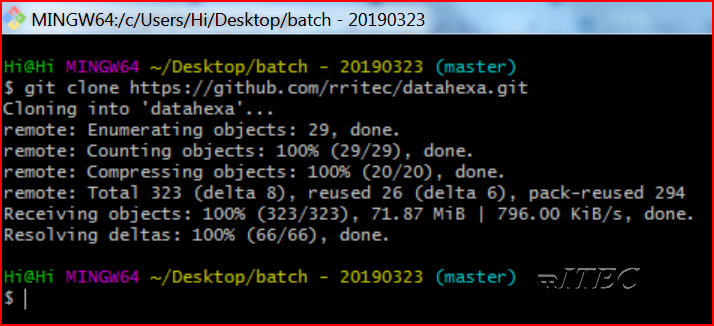
git clone https://github.com/rritec/datahexa.git
Step 3: Create a branch and check out
- in above Git Bash Window run below code
git
cd datahexa/
git checkout -b myla-ram-reddy
Step 4: Create one new jupter notebook and save into learning folder
- oper jupyter notebook
- navigate to github cloned location and navigate to learning folder
- create any new jupyter notebook with couple of lines of code
- save and close it
Step 5: observe the status
- go to GitHub shell
- run below code
git
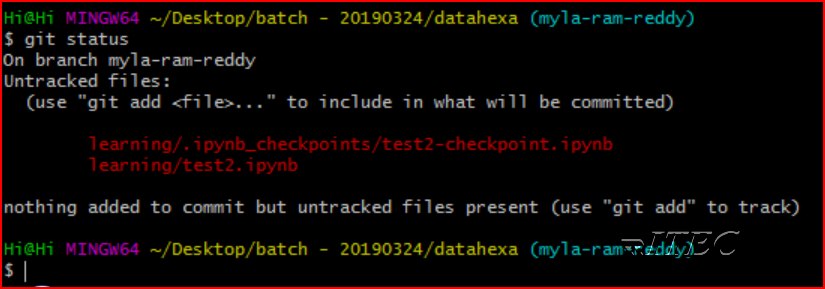
git status
- notice what ever you created jupyter notbook ,it is showing
Step 6: add to stage
- It is like mailbox draft folder(intermediate saving location)
- run below code
git
git add .
Step 7: Commit with msg
- To commit the changes run below code
git
git commit -m "first commit by myla ram reddy"

Step 8: Push the code
- To push code to GitHub repo,run below code
git
git push origin myla-ram-reddy
Step 9: raise Pull request/Merge request to master branch
- open google chrome browser, go to below URL
https://github.com/ - signin if you account or signup if you do not have account
- once sigin is completed ,type below url
https://github.com/rritec/datahexa.git - select your branch and raise new Pull Request to master
Step 10: Owner of repo will merge the code
- click on pull reqiuest
- observe the changes ,if all are good them merge to master branch
Subscribe to:
Comments (Atom)
