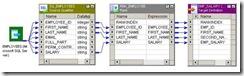
Joiner Transfomation:
- Connected and Active Transformation
- Used to join source data from two related heterogeneous sources residing in Different locations or file systems. Or, we can join data from the same source.
- If we need to join 3 tables, then we need 2 Joiner Transformations.
- The Joiner transformation joins two sources with at least one matching port. The Joiner transformation uses a condition that matches one or more pairs of Ports between the two sources.
Creating Joiner Transformation:
Follow the below steps to create a joiner transformation in informatica
- Go to the mapping designer, click on the Transformation->Create.
- Select the joiner transformation, enter a name and click on OK.
- Drag the ports from the first source into the joiner transformation. By default the designer creates the input/output ports for the source fields in the joiner transformation as detail fields.
- Now drag the ports from the second source into the joiner transformation. By default the designer configures the second source ports as master fields.
- Edit the joiner transformation, go to the ports tab and check on any box in the M column to switch the master/detail relationship for the sources.
- Go to the condition tab, click on the Add button to add a condition. You can add multiple conditions.
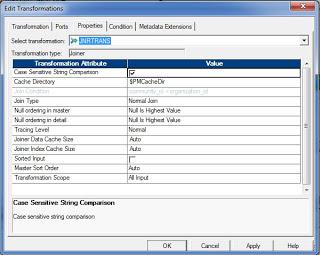
- Go to the properties tab and configure the properties of the joiner transformation.
Configuring Joiner Transformation
Configure the following properties of joiner transformation:
- Case-Sensitive String Comparison: When performing joins on string columns, the integration service uses this option. By default the case sensitive string comparison option is checked.
- Cache Directory: Directory used to cache the master or detail rows. The default directory path is $PMCacheDir. You can override this value.
- Join Type: The type of join to be performed. Normal Join, Master Outer Join, Detail Outer Join or Full Outer Join.
- Tracing Level: Level of tracing to be tracked in the session log file.
- Joiner Data Cache Size: Size of the data cache. The default value is Auto.
- Joiner Index Cache Size: Size of the index cache. The default value is Auto.
- Sorted Input: If the input data is in sorted order, then check this option for better performance.
- Master Sort Order: Sort order of the master source data. Choose Ascending if the master source data is sorted in ascending order. You have to enable Sorted Input option if you choose Ascending. The default value for this option is Auto.
- Transformation Scope: You can choose the transformation scope as All Input or Row.
Join Condition:
The integration service joins both the input sources based on the join condition. The join condition contains ports from both the input sources that must match. You can specify only the equal (=) operator between the join columns. Other operators are not allowed in the join condition. As an example, if you want to join the employees and departments table then you have to specify the join condition as department_id1= department_id. Here department_id1 is the port of departments source and department_id is the port of employees source.
Join Types:
The joiner transformation supports the following four types of joins.
Normal Join
Master Outer Join
Details Outer Join
Full Outer Join
We will learn about each join type with an example. Let say i have the following students and subjects tables as the source.
Table Name: Subjects
Subject_Id Subject_Name
-----------------------
1 Maths
2 Chemistry
3 Physics
Table Name: Students
Student_Id Subject_Id
---------------------
10 1
20 2
30 NULL
Assume that subjects source is the master and students source is the detail and we will join these sources on the subject_id port.
Normal Join:
The joiner transformation outputs only the records that match the join condition and discards all the rows that do not match the join condition. The output of the normal join is
Master Ports | Detail Ports
---------------------------------------------
Subject_Id Subject_Name Student_Id Subject_Id
--------------------------------------------
1 Maths 10 1
2 Chemistry 20 2
Master Outer Join:
In a master outer join, the joiner transformation keeps all the records from the detail source and only the matching rows from the master source. It discards the unmatched rows from the master source. The output of master outer join is
Master Ports | Detail Ports
---------------------------------------------
Subject_Id Subject_Name Student_Id Subject_Id
---------------------------------------------
1 Maths 10 1
2 Chemistry 20 2
NULL NULL 30 NULL
Detail Outer Join:
In a detail outer join, the joiner transformation keeps all the records from the master source and only the matching rows from the detail source. It discards the unmatched rows from the detail source. The output of detail outer join is
Master Ports | Detail Ports
---------------------------------------------
Subject_Id Subject_Name Student_Id Subject_Id
---------------------------------------------
1 Maths 10 1
2 Chemistry 20 2
3 Physics NULL NULL
Full Outer Join:
The full outer join first brings the matching rows from both the sources and then it also keeps the non-matched records from both the master and detail sources. The output of full outer join is
Master Ports | Detail Ports
---------------------------------------------
Subject_Id Subject_Name Student_Id Subject_Id
---------------------------------------------
1 Maths 10 1
2 Chemistry 20 2
3 Physics NULL NULL
NULL NULL 30 NULL
Sorted Input:
Use the sorted input option in the joiner properties tab when both the master and detail are sorted on the ports specified in the join condition. You can improve the performance by using the sorted input option as the integration service performs the join by minimizing the number of disk IOs. you can see good performance when worked with large data sets.
Steps to follow for configuring the sorted input option
Sort the master and detail source either by using the source qualifier transformation or sorter transformation.
Sort both the source on the ports to be used in join condition either in ascending or descending order.
Specify the Sorted Input option in the joiner transformation properties tab.
Example: To join EMP and DEPT tables.
- EMP and DEPT will be source table.
- Create a target table JOINER_EXAMPLE in target designer. Table should Contain all ports of EMP table plus DNAME and LOC as shown below.
- Create the shortcuts in your folder.
Creating Mapping:
- Open folder where we want to create the mapping.
- Click Tools -> Mapping Designer.
- Click Mapping-> Create-> Give mapping name. Ex: m_joiner_example
- Drag EMP, DEPT, and Target. Create Joiner Transformation. Link as shown below.

5. Specify the join condition in Condition tab. See steps on next page.
6. Set Master in Ports tab. See steps on next page.
7. Mapping -> Validate
8. Repository -> Save.
- Create Session and Workflow as described earlier. Run the Work flow and see the data in target table.
- Make sure to give connection information for all tables.
JOIN CONDITION:
The join condition contains ports from both input sources that must match for the Power Center Server to join two rows.
Example: DEPTNO=DEPTNO1 in above.
- Edit Joiner Transformation -> Condition Tab
- Add condition
- We can add as many conditions as needed.
- Only = operator is allowed.
If we join Char and Varchar data types, the Power Center Server counts any spaces that pad Char values as part of the string. So if you try to join the following:
Char (40) = “abcd” and Varchar (40) = “abcd”
Then the Char value is “abcd” padded with 36 blank spaces, and the Power Center Server does not join the two fields because the Char field contains trailing spaces.
Note: The Joiner transformation does not match null values.
MASTER and DETAIL TABLES
In Joiner, one table is called as MASTER and other as DETAIL.
- MASTER table is always cached. We can make any table as MASTER.
- Edit Joiner Transformation -> Ports Tab -> Select M for Master table.
Table with less number of rows should be made MASTER to improve Performance.
Reason:
- When the Power Center Server processes a Joiner transformation, it reads rows from both sources concurrently and builds the index and data cache based on the master rows. So table with fewer rows will be read fast and cache can be made as table with more rows is still being read.
- The fewer unique rows in the master, the fewer iterations of the join comparison occur, which speeds the join process.
JOINER TRANSFORMATION PROPERTIES TAB:
- Case-Sensitive String Comparison: If selected, the Power Center Server uses case-sensitive string comparisons when performing joins on string columns.
- Cache Directory: Specifies the directory used to cache master or detail rows and the index to these rows.
- Join Type: Specifies the type of join: Normal, Master Outer, Detail Outer, or Full Outer.
- Tracing Level
- Joiner Data Cache Size
- Joiner Index Cache Size
- Sorted Input
JOIN TYPES
In SQL, a join is a relational operator that combines data from multiple tables into a single result set. The Joiner transformation acts in much the same manner, except that tables can originate from different databases or flat files.
Types of Joins:
- Normal
- Master Outer
- Detail Outer
- Full Outer
Note: A normal or master outer join performs faster than a full outer or detail outer join.
Example: In EMP, we have employees with DEPTNO 10, 20, 30 and 50. In DEPT, we have DEPTNO 10, 20, 30 and 40. DEPT will be MASTER table as it has less rows.
Normal Join:
With a normal join, the Power Center Server discards all rows of data from the master and detail source that do not match, based on the condition.
- All employees of 10, 20 and 30 will be there as only they are matching.
Master Outer Join:
This join keeps all rows of data from the detail source and the matching rows from the master source. It discards the unmatched rows from the master source.
- All data of employees of 10, 20 and 30 will be there.
- There will be employees of DEPTNO 50 and corresponding DNAME and LOC Columns will be NULL.
Detail Outer Join:
This join keeps all rows of data from the master source and the matching rows from the detail source. It discards the unmatched rows from the detail source.
- All employees of 10, 20 and 30 will be there.
- There will be one record for DEPTNO 40 and corresponding data of EMP columns will be NULL.
Full Outer Join:
A full outer join keeps all rows of data from both the master and detail sources.
- All data of employees of 10, 20 and 30 will be there.
- There will be employees of DEPTNO 50 and corresponding DNAME and LOC Columns will be NULL.
- There will be one record for DEPTNO 40 and corresponding data of EMP Columns will be NULL.
USING SORTED INPUT
- Use to improve session performance.
- To use sorted input, we must pass data to the Joiner transformation sorted by the ports that are used in Join Condition.
- We check the Sorted Input Option in Properties Tab of the transformation.
- If the option is checked but we are not passing sorted data to the Transformation, then the session fails.
- We can use SORTER to sort data or Source Qualifier in case of Relational tables.
JOINER CACHES
Joiner always caches the MASTER table. We cannot disable caching. It builds Index cache and Data Cache based on MASTER table.
1) Joiner Index Cache:
- All Columns of MASTER table used in Join condition are in JOINER INDEX CACHE.
Example: DEPTNO in our mapping.
2) Joiner Data Cache:
- Master column not in join condition and used for output to other transformation or target table are in Data Cache.
Example: DNAME and LOC in our mapping example.
Performance Tuning:
- Perform joins in a database when possible.
- Join sorted data when possible.
- For a sorted Joiner transformation, designate as the master source the source with fewer duplicate key values.
Joiner can't be used in following conditions:
- Either input pipeline contains an Update Strategy transformation.
- We connect a Sequence Generator transformation directly before the Joiner transformation.
Questions:
1. What is a joiner transformation?
A joiner transformation joins two heterogeneous sources. You can also join the data from the same source. The joiner transformation joins sources with at least one matching column. The joiner uses a condition that matches one or more joins of columns between the two sources.
2. How many joiner transformations are required to join n sources?
To join n sources n-1 joiner transformations are required.
3. What are the limitations of joiner transformation?
A joiner transformation joins two heterogeneous sources. You can also join the data from the same source. The joiner transformation joins sources with at least one matching column. The joiner uses a condition that matches one or more joins of columns between the two sources.
2. How many joiner transformations are required to join n sources?
To join n sources n-1 joiner transformations are required.
3. What are the limitations of joiner transformation?
- You cannot use a joiner transformation when input pipeline contains an update strategy transformation.
- You cannot use a joiner if you connect a sequence generator transformation directly before the joiner.
4. What are the different types of joins?
- Normal join: In a normal join, the integration service discards all the rows from the master and detail source that do not match the join condition.
- Master outer join: A master outer join keeps all the rows of data from the detail source and the matching rows from the master source. It discards the unmatched rows from the master source.
- Detail outer join: A detail outer join keeps all the rows of data from the master source and the matching rows from the detail source. It discards the unmatched rows from the detail source.
- Full outer join: A full outer join keeps all rows of data from both the master and detail rows.
5. What is joiner cache?
When the integration service processes a joiner transformation, it reads the rows from master source and builds the index and data cached. Then the integration service reads the detail source and performs the join. In case of sorted joiner, the integration service reads both sources (master and detail) concurrently and builds the cache based on the master rows.
When the integration service processes a joiner transformation, it reads the rows from master source and builds the index and data cached. Then the integration service reads the detail source and performs the join. In case of sorted joiner, the integration service reads both sources (master and detail) concurrently and builds the cache based on the master rows.
6. How to improve the performance of joiner transformation?
- Join sorted data whenever possible.
- For an unsorted Joiner transformation, designate the source with fewer rows as the master source.
- For a sorted Joiner transformation, designate the source with fewer duplicate key values as the master source.
7. Why joiner is a blocking transformation?
When the integration service processes an unsorted joiner transformation, it reads all master rows before it reads the detail rows. To ensure it reads all master rows before the detail rows, the integration service blocks all the details source while it caches rows from the master source. As it blocks the detail source, the unsorted joiner is called a blocking transformation.
8. What are the settings used to configure the joiner transformation?
- Master and detail source
- Type of join
- Join condition
9. Difference between Joiner Transformation and Lookup Transformation?
Joiner | Lookup |
Active Transformation | Passive Transformation |
In joiner we cannot configure to use persistence cache, shared cache, uncached and dynamic cache
|
Where as in lookup we can configure to use persistence cache, shared cache, uncached and dynamic cache.
|
We cannot override the query in joiner
|
We can override the query in lookup to fetch the data from multiple tables.
|
We can perform outer join in joiner transformation.
|
We cannot perform outer join in lookup transformation.
|
Support Equi Join Only | Support Equi Join and Non Equi Join |
Joiner used only as source | Lkp used as source and target |
In Joiner on multiple matches it will return all matching records | In Lkp it will return either first record or last record or any value or error value |
10. Joiner Transformation Performance Improve Tips
To improve the performance of a joiner transformation follow the below tips
If possible, perform joins in a database. Performing joins in a database is faster than performing joins in a session.
You can improve the session performance by configuring the Sorted Input option in the joiner transformation properties tab.
Specify the source with fewer rows and with fewer duplicate keys as the master and the other source as detail.
11. Limitations of Joiner Transformation
The limitations of joiner transformation are
You cannot use joiner transformation when the input pipeline contains an update strategy transformation.
You cannot connect a sequence generator transformation directly to the joiner transformation.
12. Why joiner transformation is called as blocking transformation?
The integration service blocks and unblocks the source data depending on whether the joiner transformation is configured for sorted input or not.
13. Unsorted Joiner Transformation
In case of unsorted joiner transformation, the integration service first reads all the master rows before it reads the detail rows. The integration service blocks the detail source while it caches the all the master rows. Once it reads all the master rows, then it unblocks the detail source and reads the details rows.
14. Sorted Joiner Transformation
Blocking logic may or may not possible in case of sorted joiner transformation. The integration service uses blocking logic if it can do so without blocking all sources in the target load order group. Otherwise, it does not use blocking logic.
Joiner TransformationBlocking logic may or may not possible in case of sorted joiner transformation. The integration service uses blocking logic if it can do so without blocking all sources in the target load order group. Otherwise, it does not use blocking logic.