- Open existing Mapping m_connected_lkp_deptname
- Double Click on lookup → Go to properties tab → Enable Lookup cache Persistent
- Save it → Go to corresponding workflow → right click on session → click on refresh mapping
- Save it
- Notice that in cache default folder is empty
- Note : the default path is C:\Informatica\9.1.0\server\infa_shared\Cache
- Run the workflow
- Notice that target table loaded with data and also cache created
- To prove from next run onwards it will read from cache → change some source data (in my case i changed dname sales123456 to sales) → commit
- enable Truncate target table option
- Run the workflow → notice that the changed data of source not loaded in to target as it read from cache
- to read from source by skipping cache → enable recache from lookup cache
- save it → run workflow
- observe output ,the changed data of source loaded into target

For Training Contact: 91 8374899166 or 91 8790 99 81 82 or rritec@gmail.com
Monday, 14 July 2014
Persistent Cache


Saturday, 12 July 2014
Active Lookup
Step1: Create a mapping
- Use source as dept
- Create a table as target and import into informatica
- CREATE TABLE tgt_Active_lookup(
- DEPTNO number,
- DNAME varchar2(30),
- ENAME varchar2(30),
- SAL number,
- LOC varchar2(30)
- )
- Import into informatica as target
- Create a mapping with the name of m_Active_lookup
- Drag and drop source dept and target tgt_active_lookup
- click on lookup tranformation and select emp as lookup table and enable Return all values on Multiple match
- Click on ok
- Drag and drop deptno,dname,loc from source qualifier to lookup transformation
- Double click on Lookup click on condition tab and select condition as shown
- Observer policy property
- Click on ok
- connect corresponding columns from lookup to target
- save it
- create workflow and session
- run it observe run properties
- Source input records to lookup are 4 and output records are 21 hence lookup acting as a Active transformation


Wednesday, 9 July 2014
LOOKUP IN ODI 11G
Step 1: Creating target table
- open SQL DEVELOPER and execute below script
- Reverse Engineer LKP_EMP_DNAME_LOC table into RRITEC_MODEL_TARGET

Step 2: Creating INTERFACE
- Create a INTERFACE with the name of m_LOOKUP_DNAME_LOC
- DRAG AND DROP SOURCE emp AND TARGET LKP_EMP_DNAME_LOC
- Click on the lookup button
- select driving and lookup tables
- select deptno column → click on join
- Click on finish
- click on flow tab → select target → select flow_control =False
- save → run → observe output


Monday, 7 July 2014
Loading Flat File to Table in ODI 11g
Loading Flat File to Table in ODI 11g
Step1: Creating Flat File
- Navigate to folder C:\OBIEE_HOME\Oracle_ODI1\oracledi\RRITEC
- Create a text file as shown → name it as emp → save → close

Step 2: Creating File data server and physical schema
- Open ODI 11g Studio
- Go to topology tab
- Right click on file technology
- Click on new data server → provide below information
- Click on JDBC → provide below information
- Click on save
- Right Click on RRITEC_FLATFILES data server → click on new physical schema → provide as shown
- Click on save → click on ok


Step 3: Creating Logical schema and mapping to context
- Expand logical architecture → right click on file technology → click on new logical schema → give name and map to context → save

Step 4: Creating Model
- Goto designer navigator → under the models section → right click on RRITEC model Folder → Click on new Model → Provide as shown
- save → Close
- Right clcik on above model → clik on new data store → in definition tab
- Click on files tab
- Click on columns tab
- save → close

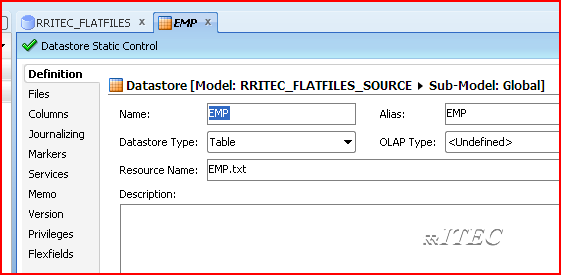

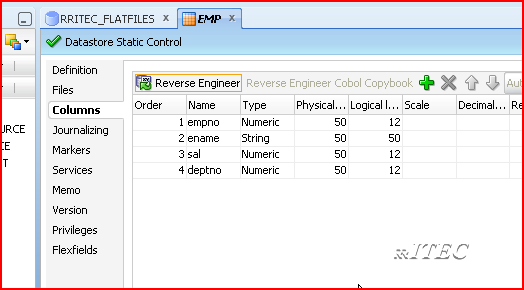
- Connect to your target schema( ex : B10711GTDBU)
- Execute below script
- Reverse engineer this into target model
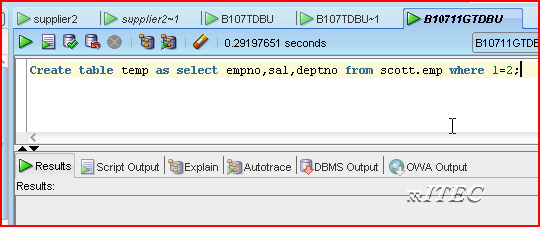

Step 6: Creating interface
- Expand projects → expand RRITEC folder → Right click on interface → new interface
- name it as m_flatfile_to_table
- Click on mapping tab
- Drag and drop source and target
- Make sure automatic source to mapping created and select the workspace as staging area
- Select flow tab → select source → select LKM as LKM FILE TO SQL
- Select target → select IKM as IKM SQL CONTROL APPEND
- select the option FLOW_CONTROL = FALSE
- save → run
- Observe output

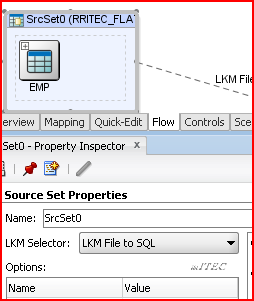


Step 6: Add filter to above interface
- Duplicate above interface and rename as m_flatfile_to_table_filter
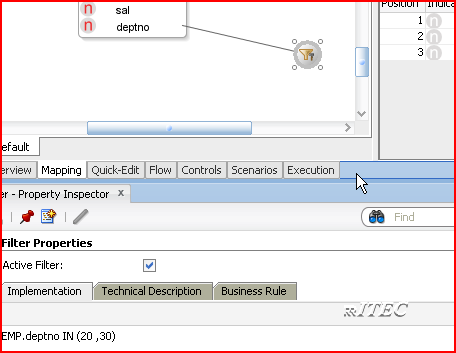
- click on mapping tab → from source drag and drop Deptno column in to empty work area
- select the filter object → provide below condition
- Click on flow tab
- select target → select truncate option as true
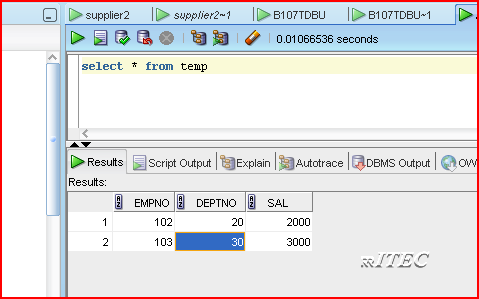
- save → run → observe output

Sunday, 6 July 2014
Weblogic Server upgrade from 10.3.5 to 10.3.6 error
Fatal error occurred during file installation .the installer will clean up and exit.
beasvc .exe file is busy

End process beasvc.exe from task manager and try to install again

beasvc .exe file is busy
End process beasvc.exe from task manager and try to install again
Guidelines to post reviews and likes
- Like RRITEC face Book Page
- Click on URL https://www.facebook.com/rritec/reviews
- Click on write review --> type review and write your comments and give required star rating

- 2. Post review in RRITEC Face Book Page

- Click on URL https://www.facebook.com/rritec/reviews

- Navigate to required page of blog Page (ex OBIEE ,ODI,..etc) http://rritec.blogspot.in/p/obiee.html
- scroll to bottom of the page --> type it and publish it
-

- Go to blog http://rritec.blogspot.in/
- Click on Join this site and follow the wizard
-

Subscribe to:
Posts (Atom)